Pattern Review: Kelly Anorak by Closet Core Pattern
- Jan 30, 2022
- 4 min read

About 5 years ago, I wrote a pattern review of the Kelly Anorak. Back then I made the unlined version with the collar. You can find it here and I thought it was time to write an updated review. This was actually my very first pattern review and not very detailed, so I am glad that I can write an update now.
The pattern comes as both paper pattern and PDF version from Closet Core Pattern. The anorak is a classic shape, slightly loose but not boxy. It comes in two version: with a collar or with a hood. The pattern is available in sizes 0 - 20 (bust 79 cm to 117 cm).
The very first jacket, 5 years ago, I made the version with the collar. Since I had very little fitting experience, I made ZERO adjustments to the pattern and sewed a straight size 14. Back then, I was just super pleased with myself that I could actually make a jacket that fit mattered very little.

Since then, I learned a lot about what fit adjustments I have to make. I learned that my legs are shorter in proportion to my body. I also learnt that I had a broad back; and recently to I like my shoulder/sleeve seams to sit exactly where my shoulder finishes - I'd call it a classic sleeve. Dropped shoulders or ruffled sleeve heads don't suit me.
When I bought the burgundy fabric, back in Malaysia, I also picked up a grey corduroy. Which since, I have fallen out of love with; or more or less realized that this shade of grey doesn't suit me and it would also be hard to pair with my clothes. But I decided to use it as a toile.
So I made a size 14 again but this time I shortened the jacket by 2". Because the pattern has so many pieces, be carefully that you this is ALL pieces necessary: front & back; all the placket pieces as well as the lining pieces! On top of shortening the jacket, I also made a broad back adjustment by only 1cm (instead of my usual 2cm), just because I thought the jacket was loosely fitted and 1cm should be enough. Plus, I was a bit too lazy to add and sew another dart. If you make similar adjustments, again, make sure you do them to all relevant pieces. I say that again, since I forgot to make this adjustment to the back yoke. Luckily, I had enough fabric to cut another piece.
The sewing instructions are good, like most of Closet Core patterns and I am glad that they added a sew-along to their website. Because some steps are difficult to see if you only have illustrations, for instance when the sleeve lining joins the outer fabric. I find the illustration very little help but the picture on the sew-along is super clear.
When sewing the zipper, be careful to offset the zipper by 1/4". In the instructions, it says to sew with a 5/8" seam allowance but most zipper tapes are only 3/8" wide. If you don't do this, it will make your jacket 1/2" wider which doesn't like a big problem but it also means when the right placket closes over the zipper to the left, you won't have enough room for the button snaps.
My lining fabric for the hood as well as the back piece ended up a little too wide, so I simply sewed the seams with a bigger seam allowance to make it fit. I think that is my mistake since it only happened with the black version, and not the grey one.

I was pretty happy with the length of the jacket and the fit around the back. One thing I noticed, that the sleeve seams are about 1/2" further done from my shoulders. So I had a look on Instagram if this is supposed to be the style of the jackets or not. Most jackets looked like that they fit perfectly along the actual shoulder. During the last few years, I also noticed that classic sleeves suit me better than dropped shoulders. So even if it was the style of the jacket, I would have wanted to make this change anyway. I decided to go for a narrow shoulder adjustment. I simply took away 1/2" from the armsyce (just where the shoulder seam meets the sleeve) but kept the original pattern at the sleeve notches. I repeated this adjustment for the lining as well as the front and back yokes. Now the sleeve seams sit perfect on my shoulders.
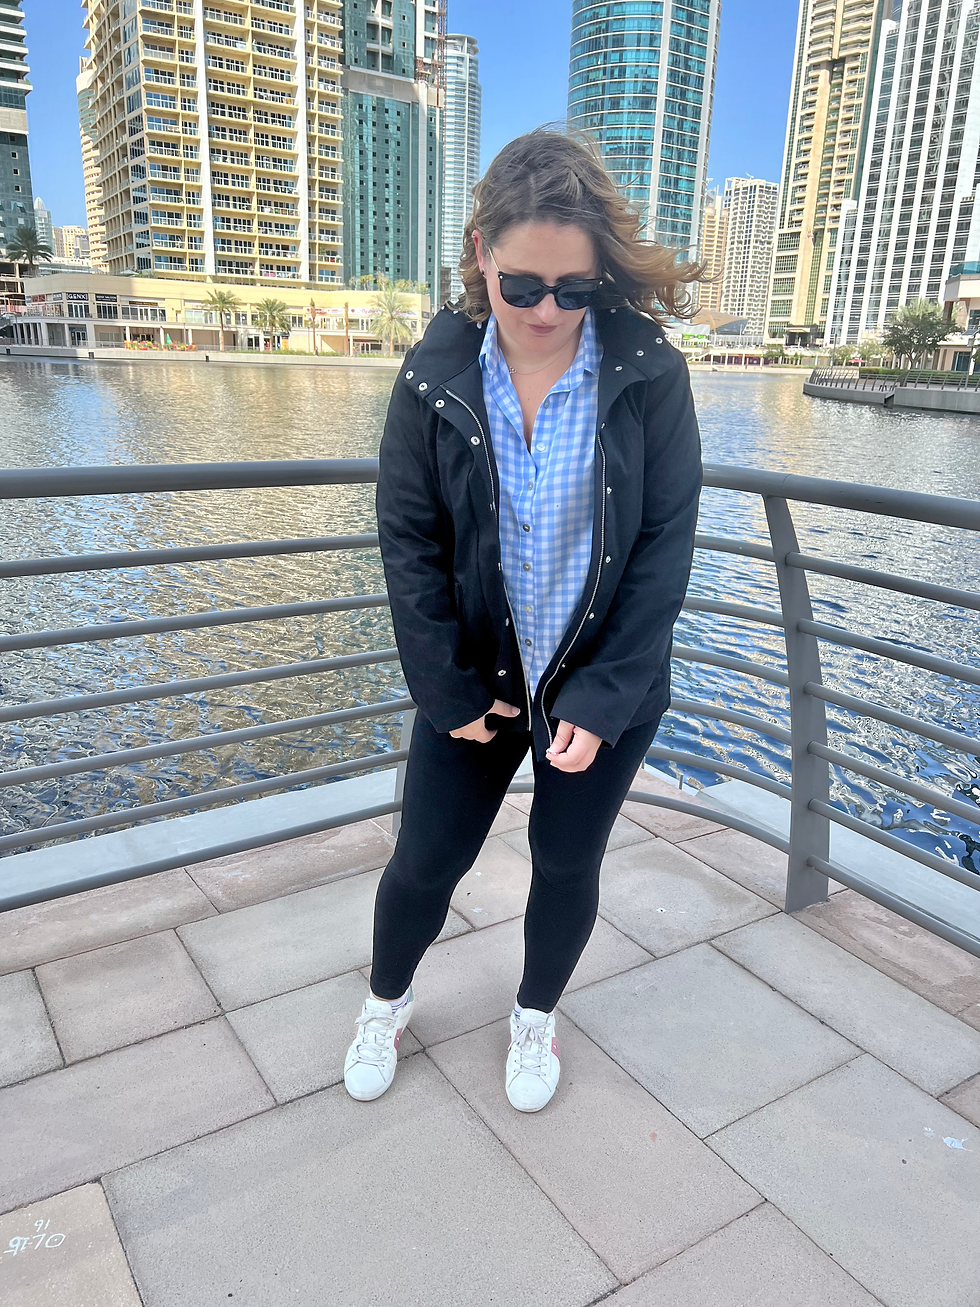
For my final version, I choose a black cotton drill fabric. Many years ago, I owned a jacket from H&M and I loved it. It was very similar to the Kelly Anorak and I wanted to make a black jacket since it also goes well with many of my other clothes (super colourful wardrobe). The lining fabric I changed 3 times. I first wanted to use a fabric I had bought in Hong Kong. It turned out to be a stretch cotton. I thought, two cotton fabrics might be a little too warm but also make it more difficult to slide in and out. So I changed to a viscose fabric in a brown leopard print. While I love leopard prints, I wasn't quite happy with the choice and therefore didn't start cutting the pieces. During a sale from Fabric Godmother, I ordered a black viscose with white polka dots and planned a dress when I ordered it. When it arrived, I thought it was quite thin but I loved it and felt it was perfect for my lining fabric. And so the decision was made and I started cutting all my pieces just before Christmas.

With this project, I learnt again how difficult fabric 'behaves'. The grey corduroy fabric is soft, flexible and has more drape. While the the black cotton drill is stiffer with less drape. Which means, when moving my arms up, like I'd be driving a car, the sleeves feel a little tight but only for the black jacket, not the grey one. Since I won't be driving with the jacket on.
The grey jacket already made it all the way to Germany and my mom is enjoying wearing it.


The jacket works perfectly with my Infinity scarf 😍 Learn to make your own here. I cannot wait to travel to Germany and Scotland and wear it!

Thanks for hanging out with me. I am very much into making outer wear at the moment. Have you made any jackets or blazers yet?
Happy Sewing!
Maria


مع كثرة الوقت الذي نقضيه داخل البيئات الرقمية المختلفة، بدأت ألاحظ كيف أن العقل يغيّر طريقة تركيزه بشكل مستمر دون أن نشعر بذلك في اللحظة نفسها. وخلال هذا النوع من المراقبة ظهر https://melbetegypt.org/ كعنصر ضمن هذا التدفق العام للمعلومات، دون أي أهمية خاصة بحد ذاته. أكثر ما لفت انتباهي لم يكن الموقع، بل الطريقة التي يستجيب بها الذهن للتفاصيل الصغيرة والإيقاع المتغير للمحتوى المحيط. أحيانًا يكون الانتباه حاضرًا وواضحًا لفترة طويلة، وأحيانًا يبدأ بالتراجع تدريجيًا مع تراكم المؤثرات. هذه الملاحظات جعلتني أكثر إدراكًا لكيفية عمل التركيز الذهني وكيف أن التغيرات البسيطة قد تؤثر على صفاء التفكير دون أن نلاحظ ذلك فورًا. وفي النهاية، يصبح فهم هذه الأنماط الداخلية وسيلة مهمة للتعامل مع الروتين اليومي بطريقة أكثر هدوءًا وتنظيمًا.